- Python
- Node
- Java
- Kotlin
- C#
您可以在此处找到本教程的完整代码。将 您可以在此处找到完整的 客户端将:
系统要求
在开始之前,确保您的系统满足这些要求:- Mac 或 Windows 计算机
- 已安装最新 Python 版本
- 已安装最新版本的
uv
设置您的环境
首先,使用uv 创建一个新的 Python 项目:# 创建项目目录
uv init mcp-client
cd mcp-client
# 创建虚拟环境
uv venv
# 激活虚拟环境
source .venv/bin/activate
# 安装所需包
uv add mcp anthropic python-dotenv
# 删除样板文件
rm main.py
# 创建我们的主文件
touch client.py
设置您的 API 密钥
您需要从 Anthropic Console 获取 Anthropic API 密钥。创建一个.env 文件来存储它:echo "ANTHROPIC_API_KEY=your-api-key-goes-here" > .env
.env 添加到您的 .gitignore:echo ".env" >> .gitignore
确保您保持
ANTHROPIC_API_KEY 的安全!创建客户端
基本客户端结构
首先,让我们设置导入并创建基本客户端类:import asyncio
from typing import Optional
from contextlib import AsyncExitStack
from mcp import ClientSession, StdioServerParameters
from mcp.client.stdio import stdio_client
from anthropic import Anthropic
from dotenv import load_dotenv
load_dotenv() # load environment variables from .env
class MCPClient:
def __init__(self):
# Initialize session and client objects
self.session: Optional[ClientSession] = None
self.exit_stack = AsyncExitStack()
self.anthropic = Anthropic()
# methods will go here
服务器连接管理
接下来,我们将实现连接到 MCP 服务器的方法:async def connect_to_server(self, server_script_path: str):
"""连接到 MCP 服务器
Args:
server_script_path: 服务器脚本路径(.py 或 .js)
"""
is_python = server_script_path.endswith('.py')
is_js = server_script_path.endswith('.js')
if not (is_python or is_js):
raise ValueError("Server script must be a .py or .js file")
command = "python" if is_python else "node"
server_params = StdioServerParameters(
command=command,
args=[server_script_path],
env=None
)
stdio_transport = await self.exit_stack.enter_async_context(stdio_client(server_params))
self.stdio, self.write = stdio_transport
self.session = await self.exit_stack.enter_async_context(ClientSession(self.stdio, self.write))
await self.session.initialize()
# List available tools
response = await self.session.list_tools()
tools = response.tools
print("\nConnected to server with tools:", [tool.name for tool in tools])
查询处理逻辑
现在让我们添加处理查询和处理工具调用的核心功能:async def process_query(self, query: str) -> str:
"""使用 Claude 和可用工具处理查询"""
messages = [
{
"role": "user",
"content": query
}
]
response = await self.session.list_tools()
available_tools = [{
"name": tool.name,
"description": tool.description,
"input_schema": tool.inputSchema
} for tool in response.tools]
# 初始 Claude API 调用
response = self.anthropic.messages.create(
model="claude-3-5-sonnet-20241022",
max_tokens=1000,
messages=messages,
tools=available_tools
)
# 处理响应并处理工具调用
final_text = []
assistant_message_content = []
for content in response.content:
if content.type == 'text':
final_text.append(content.text)
assistant_message_content.append(content)
elif content.type == 'tool_use':
tool_name = content.name
tool_args = content.input
# 执行工具调用
result = await self.session.call_tool(tool_name, tool_args)
final_text.append(f"[Calling tool {tool_name} with args {tool_args}]")
assistant_message_content.append(content)
messages.append({
"role": "assistant",
"content": assistant_message_content
})
messages.append({
"role": "user",
"content": [
{
"type": "tool_result",
"tool_use_id": content.id,
"content": result.content
}
]
})
# Get next response from Claude
response = self.anthropic.messages.create(
model="claude-3-5-sonnet-20241022",
max_tokens=1000,
messages=messages,
tools=available_tools
)
final_text.append(response.content[0].text)
return "\n".join(final_text)
交互式聊天界面
现在我们将添加聊天循环和清理功能:async def chat_loop(self):
"""运行交互式聊天循环"""
print("\nMCP 客户端已启动!")
print("输入您的查询或输入 'quit' 退出。")
while True:
try:
query = input("\n查询: ").strip()
if query.lower() == 'quit':
break
response = await self.process_query(query)
print("\n" + response)
except Exception as e:
print(f"\n错误: {str(e)}")
async def cleanup(self):
"""清理资源"""
await self.exit_stack.aclose()
主入口点
最后,我们将添加主执行逻辑:async def main():
if len(sys.argv) < 2:
print("用法: python client.py <服务器脚本路径>")
sys.exit(1)
client = MCPClient()
try:
await client.connect_to_server(sys.argv[1])
await client.chat_loop()
finally:
await client.cleanup()
if __name__ == "__main__":
import sys
asyncio.run(main())
client.py 文件。关键组件解释
1. 客户端初始化
MCPClient类使用会话管理和 API 客户端进行初始化- 使用
AsyncExitStack进行适当的资源管理 - 配置 Anthropic 客户端用于 Claude 交互
2. 服务器连接
- 支持 Python 和 Node.js 服务器
- 验证服务器脚本类型
- 设置适当的通信通道
- 初始化会话并列出可用工具
3. 查询处理
- 维护对话上下文
- 处理 Claude 的响应和工具调用
- 管理 Claude 和工具之间的消息流
- 将结果组合成连贯的响应
4. 交互式界面
- 提供简单的命令行界面
- 处理用户输入并显示响应
- 包括基本的错误处理
- 允许优雅退出
5. 资源管理
- 适当清理资源
- 处理连接问题的错误处理
- 优雅的关闭过程
常见自定义点
-
工具处理
- 修改
process_query()以处理特定工具类型 - 为工具调用添加自定义错误处理
- 实现工具特定的响应格式化
- 修改
-
响应处理
- 自定义工具结果的格式化方式
- 添加响应过滤或转换
- 实现自定义日志记录
-
用户界面
- 添加 GUI 或 Web 界面
- 实现丰富的控制台输出
- 添加命令历史记录或自动补全
运行客户端
要使用任何 MCP 服务器运行您的客户端:uv run client.py path/to/server.py # python 服务器
uv run client.py path/to/build/index.js # node 服务器
如果您正在继续服务器快速入门中的天气教程,您的命令可能如下所示:
python client.py .../quickstart-resources/weather-server-python/weather.py- 连接到指定的服务器
- 列出可用工具
- 开始交互式聊天会话,您可以:
- 输入查询
- 查看工具执行
- 从 Claude 获取响应
工作原理
当您提交查询时:- 客户端从服务器获取可用工具列表
- 您的查询连同工具描述一起发送给 Claude
- Claude 决定使用哪些工具(如果有)
- 客户端通过服务器执行任何请求的工具调用
- 结果发送回 Claude
- Claude 提供自然语言响应
- 响应显示给您
最佳实践
-
错误处理
- 始终在 try-catch 块中包装工具调用
- 提供有意义的错误消息
- 优雅地处理连接问题
-
资源管理
- 使用
AsyncExitStack进行适当清理 - 完成后关闭连接
- 处理服务器断开连接
- 使用
-
安全性
- 将 API 密钥安全存储在
.env中 - 验证服务器响应
- 对工具权限保持谨慎
- 将 API 密钥安全存储在
-
工具名称
- 工具名称可以根据此处指定的格式进行验证
- 如果工具名称符合指定格式,它不应该被 MCP 客户端验证失败
故障排除
服务器路径问题
- 仔细检查服务器脚本的路径是否正确
- 如果相对路径不起作用,请使用绝对路径
- 对于 Windows 用户,确保在路径中使用正斜杠 (/) 或转义的反斜杠 (\)
- 验证服务器文件具有正确的扩展名(Python 为 .py,Node.js 为 .js)
# 相对路径
uv run client.py ./server/weather.py

# 绝对路径
uv run client.py /Users/username/projects/mcp-server/weather.py

# Windows 路径(任一格式都有效)
uv run client.py C:/projects/mcp-server/weather.py
uv run client.py C:\\projects\\mcp-server\\weather.py
响应时间
- 第一个响应可能需要长达 30 秒才能返回
- 这是正常的,会发生以下情况:
- 服务器正在初始化
- Claude 正在处理查询
- 工具正在执行
- 后续响应通常更快
- 在这个初始等待期间不要中断进程
常见错误消息
如果您看到:FileNotFoundError:检查您的服务器路径Connection refused:确保服务器正在运行且路径正确Tool execution failed:验证工具所需的环境变量已设置Timeout error:考虑在客户端配置中增加超时时间
您可以在此处找到本教程的完整代码。更新您的 在项目根目录创建 将 The client will:
系统要求
在开始之前,确保您的系统满足这些要求:- Mac 或 Windows 计算机
- 已安装 Node.js 17 或更高版本
- 已安装最新版本的
npm - Anthropic API 密钥(Claude)
设置您的环境
首先,让我们创建并设置项目:# 创建项目目录
mkdir mcp-client-typescript
cd mcp-client-typescript
# 初始化 npm 项目
npm init -y
# 安装依赖
npm install @anthropic-ai/sdk @modelcontextprotocol/sdk dotenv
# 安装开发依赖
npm install -D @types/node typescript
# 创建源文件
touch index.ts
package.json 以设置 type: "module" 和构建脚本:package.json
{
  "type": "module",
  "scripts": {
    "build": "tsc && chmod 755 build/index.js"
  }
}
tsconfig.json:tsconfig.json
{
  "compilerOptions": {
    "target": "ES2022",
    "module": "Node16",
    "moduleResolution": "Node16",
    "outDir": "./build",
    "rootDir": "./",
    "strict": true,
    "esModuleInterop": true,
    "skipLibCheck": true,
    "forceConsistentCasingInFileNames": true
  },
  "include": ["index.ts"],
  "exclude": ["node_modules"]
}
设置您的 API 密钥
您需要从 Anthropic Console 获取 Anthropic API 密钥。创建一个.env 文件来存储它:echo "ANTHROPIC_API_KEY=<您的密钥>" > .env
.env 添加到您的 .gitignore:echo ".env" >> .gitignore
确保您保持
ANTHROPIC_API_KEY 的安全!创建客户端
基本客户端结构
首先,让我们在index.ts 中设置导入并创建基本客户端类:import { Anthropic } from "@anthropic-ai/sdk";
import {
MessageParam,
Tool,
} from "@anthropic-ai/sdk/resources/messages/messages.mjs";
import { Client } from "@modelcontextprotocol/sdk/client/index.js";
import { StdioClientTransport } from "@modelcontextprotocol/sdk/client/stdio.js";
import readline from "readline/promises";
import dotenv from "dotenv";
dotenv.config();
const ANTHROPIC_API_KEY = process.env.ANTHROPIC_API_KEY;
if (!ANTHROPIC_API_KEY) {
throw new Error("ANTHROPIC_API_KEY 未设置");
}
class MCPClient {
private mcp: Client;
private anthropic: Anthropic;
private transport: StdioClientTransport | null = null;
private tools: Tool[] = [];
constructor() {
this.anthropic = new Anthropic({
apiKey: ANTHROPIC_API_KEY,
});
this.mcp = new Client({ name: "mcp-client-cli", version: "1.0.0" });
}
// 方法将放在这里
}
服务器连接管理
接下来,我们将实现连接到 MCP 服务器的方法:async connectToServer(serverScriptPath: string) {
try {
const isJs = serverScriptPath.endsWith(".js");
const isPy = serverScriptPath.endsWith(".py");
if (!isJs && !isPy) {
throw new Error("服务器脚本必须是 .js 或 .py 文件");
}
const command = isPy
? process.platform === "win32"
? "python"
: "python3"
: process.execPath;
this.transport = new StdioClientTransport({
command,
args: [serverScriptPath],
});
await this.mcp.connect(this.transport);
const toolsResult = await this.mcp.listTools();
this.tools = toolsResult.tools.map((tool) => {
return {
name: tool.name,
description: tool.description,
input_schema: tool.inputSchema,
};
});
console.log(
"已连接到服务器,工具:",
this.tools.map(({ name }) => name)
);
} catch (e) {
console.log("连接到 MCP 服务器失败:", e);
throw e;
}
}
查询处理逻辑
现在让我们添加处理查询和处理工具调用的核心功能:async processQuery(query: string) {
const messages: MessageParam[] = [
{
role: "user",
content: query,
},
];
const response = await this.anthropic.messages.create({
model: "claude-3-5-sonnet-20241022",
max_tokens: 1000,
messages,
tools: this.tools,
});
const finalText = [];
for (const content of response.content) {
if (content.type === "text") {
finalText.push(content.text);
} else if (content.type === "tool_use") {
const toolName = content.name;
const toolArgs = content.input as { [x: string]: unknown } | undefined;
const result = await this.mcp.callTool({
name: toolName,
arguments: toolArgs,
});
finalText.push(
`[调用工具 ${toolName} 参数 ${JSON.stringify(toolArgs)}]`
);
messages.push({
role: "user",
content: result.content as string,
});
const response = await this.anthropic.messages.create({
model: "claude-3-5-sonnet-20241022",
max_tokens: 1000,
messages,
});
finalText.push(
response.content[0].type === "text" ? response.content[0].text : ""
);
}
}
return finalText.join("\n");
}
交互式聊天界面
现在我们将添加聊天循环和清理功能:async chatLoop() {
const rl = readline.createInterface({
input: process.stdin,
output: process.stdout,
});
try {
console.log("\nMCP Client Started!");
console.log("Type your queries or 'quit' to exit.");
while (true) {
const message = await rl.question("\nQuery: ");
if (message.toLowerCase() === "quit") {
break;
}
const response = await this.processQuery(message);
console.log("\n" + response);
}
} finally {
rl.close();
}
}
async cleanup() {
await this.mcp.close();
}
Main Entry Point
Finally, we’ll add the main execution logic:async function main() {
if (process.argv.length < 3) {
console.log("Usage: node index.ts <path_to_server_script>");
return;
}
const mcpClient = new MCPClient();
try {
await mcpClient.connectToServer(process.argv[2]);
await mcpClient.chatLoop();
} finally {
await mcpClient.cleanup();
process.exit(0);
}
}
main();
Running the Client
To run your client with any MCP server:# Build TypeScript
npm run build
# Run the client
node build/index.js path/to/server.py # python server
node build/index.js path/to/build/index.js # node server
If you’re continuing the weather tutorial from the server quickstart, your command might look something like this:
node build/index.js .../quickstart-resources/weather-server-typescript/build/index.js- Connect to the specified server
- List available tools
- Start an interactive chat session where you can:
- Enter queries
- See tool executions
- Get responses from Claude
How It Works
When you submit a query:- The client gets the list of available tools from the server
- Your query is sent to Claude along with tool descriptions
- Claude decides which tools (if any) to use
- The client executes any requested tool calls through the server
- Results are sent back to Claude
- Claude provides a natural language response
- The response is displayed to you
Best practices
-
Error Handling
- Use TypeScript’s type system for better error detection
- Wrap tool calls in try-catch blocks
- Provide meaningful error messages
- Gracefully handle connection issues
-
Security
- Store API keys securely in
.env - Validate server responses
- Be cautious with tool permissions
- Store API keys securely in
Troubleshooting
Server Path Issues
- Double-check the path to your server script is correct
- Use the absolute path if the relative path isn’t working
- For Windows users, make sure to use forward slashes (/) or escaped backslashes (\) in the path
- Verify the server file has the correct extension (.js for Node.js or .py for Python)
# Relative path
node build/index.js ./server/build/index.js

# Absolute path
node build/index.js /Users/username/projects/mcp-server/build/index.js

# Windows path (either format works)
node build/index.js C:/projects/mcp-server/build/index.js
node build/index.js C:\\projects\\mcp-server\\build\\index.js
Response Timing
- The first response might take up to 30 seconds to return
- This is normal and happens while:
- The server initializes
- Claude processes the query
- Tools are being executed
- Subsequent responses are typically faster
- Don’t interrupt the process during this initial waiting period
Common Error Messages
If you see:Error: Cannot find module: Check your build folder and ensure TypeScript compilation succeededConnection refused: Ensure the server is running and the path is correctTool execution failed: Verify the tool’s required environment variables are setANTHROPIC_API_KEY is not set: Check your .env file and environment variablesTypeError: Ensure you’re using the correct types for tool arguments
This is a quickstart demo based on Spring AI MCP auto-configuration and boot starters.
To learn how to create sync and async MCP Clients manually, consult the Java SDK Client documentation
System Requirements
Before starting, ensure your system meets these requirements:- Java 17 or higher
- Maven 3.6+
- npx package manager
- Anthropic API key (Claude)
- Brave Search API key
Setting Up Your Environment
-
Install npx (Node Package eXecute):
First, make sure to install npm
and then run:
npm install -g npx -
Clone the repository:
git clone https://github.com/spring-projects/spring-ai-examples.git cd model-context-protocol/brave-chatbot -
Set up your API keys:
export ANTHROPIC_API_KEY='your-anthropic-api-key-here' export BRAVE_API_KEY='your-brave-api-key-here' -
Build the application:
./mvnw clean install -
Run the application using Maven:
./mvnw spring-boot:run
Make sure you keep your
ANTHROPIC_API_KEY and BRAVE_API_KEY keys secure!How it Works
The application integrates Spring AI with the Brave Search MCP server through several components:MCP Client Configuration
- Required dependencies in pom.xml:
<dependency>
    <groupId>org.springframework.ai</groupId>
    <artifactId>spring-ai-starter-mcp-client</artifactId>
</dependency>
<dependency>
    <groupId>org.springframework.ai</groupId>
    <artifactId>spring-ai-starter-model-anthropic</artifactId>
</dependency>
- Application properties (application.yml):
spring:
  ai:
    mcp:
      client:
        enabled: true
        name: brave-search-client
        version: 1.0.0
        type: SYNC
        request-timeout: 20s
        stdio:
          root-change-notification: true
          servers-configuration: classpath:/mcp-servers-config.json
        toolcallback:
          enabled: true
    anthropic:
      api-key: ${ANTHROPIC_API_KEY}
spring-ai-starter-mcp-client to create one or more McpClients based on the provided server configuration.
The spring.ai.mcp.client.toolcallback.enabled=true property enables the tool callback mechanism, that automatically registers all MCP tool as spring ai tools.
It is disabled by default.- MCP Server Configuration (
mcp-servers-config.json):
{
  "mcpServers": {
    "brave-search": {
      "command": "npx",
      "args": ["-y", "@modelcontextprotocol/server-brave-search"],
      "env": {
        "BRAVE_API_KEY": "<PUT YOUR BRAVE API KEY>"
      }
    }
  }
}
Chat Implementation
The chatbot is implemented using Spring AI’s ChatClient with MCP tool integration:var chatClient = chatClientBuilder
.defaultSystem("You are useful assistant, expert in AI and Java.")
.defaultToolCallbacks((Object[]) mcpToolAdapter.toolCallbacks())
.defaultAdvisors(new MessageChatMemoryAdvisor(new InMemoryChatMemory()))
.build();
- Uses Claude AI model for natural language understanding
- Integrates Brave Search through MCP for real-time web search capabilities
- Maintains conversation memory using InMemoryChatMemory
- Runs as an interactive command-line application
Build and run
./mvnw clean install
java -jar ./target/ai-mcp-brave-chatbot-0.0.1-SNAPSHOT.jar
./mvnw spring-boot:run
- Answer questions using its built-in knowledge
- Perform web searches when needed using Brave Search
- Remember context from previous messages in the conversation
- Combine information from multiple sources to provide comprehensive answers
Advanced Configuration
The MCP client supports additional configuration options:- Client customization through
McpSyncClientCustomizerorMcpAsyncClientCustomizer - Multiple clients with multiple transport types:
STDIOandSSE(Server-Sent Events) - Integration with Spring AI’s tool execution framework
- Automatic client initialization and lifecycle management
<dependency>
    <groupId>org.springframework.ai</groupId>
    <artifactId>spring-ai-mcp-client-webflux-spring-boot-starter</artifactId>
</dependency>
You can find the complete code for this tutorial here.Now, let’s create and set up your project:After running Also, add the following plugins to your build script:Also create a helper function to convert from The client will:
System Requirements
Before starting, ensure your system meets these requirements:- Java 17 or higher
- Anthropic API key (Claude)
Setting up your environment
First, let’s installjava and gradle if you haven’t already.
You can download java from official Oracle JDK website.
Verify your java installation:java --version
# Create a new directory for our project
mkdir kotlin-mcp-client
cd kotlin-mcp-client

# Initialize a new kotlin project
gradle init
gradle init, you will be presented with options for creating your project.
Select Application as the project type, Kotlin as the programming language, and Java 17 as the Java version.Alternatively, you can create a Kotlin application using the IntelliJ IDEA project wizard.After creating the project, add the following dependencies:val mcpVersion = "0.4.0"
val slf4jVersion = "2.0.9"
val anthropicVersion = "0.8.0"
dependencies {
implementation("io.modelcontextprotocol:kotlin-sdk:$mcpVersion")
implementation("org.slf4j:slf4j-nop:$slf4jVersion")
implementation("com.anthropic:anthropic-java:$anthropicVersion")
}
plugins {
    id("com.github.johnrengelman.shadow") version "8.1.1"
}
Setting up your API key
You’ll need an Anthropic API key from the Anthropic Console.Set up your API key:export ANTHROPIC_API_KEY='your-anthropic-api-key-here'
Make sure your keep your
ANTHROPIC_API_KEY secure!Creating the Client
Basic Client Structure
First, let’s create the basic client class:class MCPClient : AutoCloseable {
private val anthropic = AnthropicOkHttpClient.fromEnv()
private val mcp: Client = Client(clientInfo = Implementation(name = "mcp-client-cli", version = "1.0.0"))
private lateinit var tools: List<ToolUnion>
// methods will go here
override fun close() {
runBlocking {
mcp.close()
anthropic.close()
}
}
Server connection management
Next, we’ll implement the method to connect to an MCP server:suspend fun connectToServer(serverScriptPath: String) {
try {
val command = buildList {
when (serverScriptPath.substringAfterLast(".")) {
"js" -> add("node")
"py" -> add(if (System.getProperty("os.name").lowercase().contains("win")) "python" else "python3")
"jar" -> addAll(listOf("java", "-jar"))
else -> throw IllegalArgumentException("Server script must be a .js, .py or .jar file")
}
add(serverScriptPath)
}
val process = ProcessBuilder(command).start()
val transport = StdioClientTransport(
input = process.inputStream.asSource().buffered(),
output = process.outputStream.asSink().buffered()
)
mcp.connect(transport)
val toolsResult = mcp.listTools()
tools = toolsResult?.tools?.map { tool ->
ToolUnion.ofTool(
Tool.builder()
.name(tool.name)
.description(tool.description ?: "")
.inputSchema(
Tool.InputSchema.builder()
.type(JsonValue.from(tool.inputSchema.type))
.properties(tool.inputSchema.properties.toJsonValue())
.putAdditionalProperty("required", JsonValue.from(tool.inputSchema.required))
.build()
)
.build()
)
} ?: emptyList()
println("Connected to server with tools: ${tools.joinToString(", ") { it.tool().get().name() }}")
} catch (e: Exception) {
println("Failed to connect to MCP server: $e")
throw e
}
}
JsonObject to JsonValue for Anthropic:private fun JsonObject.toJsonValue(): JsonValue {
val mapper = ObjectMapper()
val node = mapper.readTree(this.toString())
return JsonValue.fromJsonNode(node)
}
Query processing logic
Now let’s add the core functionality for processing queries and handling tool calls:private val messageParamsBuilder: MessageCreateParams.Builder = MessageCreateParams.builder()
.model(Model.CLAUDE_3_5_SONNET_20241022)
.maxTokens(1024)
suspend fun processQuery(query: String): String {
val messages = mutableListOf(
MessageParam.builder()
.role(MessageParam.Role.USER)
.content(query)
.build()
)
val response = anthropic.messages().create(
messageParamsBuilder
.messages(messages)
.tools(tools)
.build()
)
val finalText = mutableListOf<String>()
response.content().forEach { content ->
when {
content.isText() -> finalText.add(content.text().getOrNull()?.text() ?: "")
content.isToolUse() -> {
val toolName = content.toolUse().get().name()
val toolArgs =
content.toolUse().get()._input().convert(object : TypeReference<Map<String, JsonValue>>() {})
val result = mcp.callTool(
name = toolName,
arguments = toolArgs ?: emptyMap()
)
finalText.add("[Calling tool $toolName with args $toolArgs]")
messages.add(
MessageParam.builder()
.role(MessageParam.Role.USER)
.content(
"""
"type": "tool_result",
"tool_name": $toolName,
"result": ${result?.content?.joinToString("\n") { (it as TextContent).text ?: "" }}
""".trimIndent()
)
.build()
)
val aiResponse = anthropic.messages().create(
messageParamsBuilder
.messages(messages)
.build()
)
finalText.add(aiResponse.content().first().text().getOrNull()?.text() ?: "")
}
}
}
return finalText.joinToString("\n", prefix = "", postfix = "")
}
Interactive chat
We’ll add the chat loop:suspend fun chatLoop() {
println("\nMCP Client Started!")
println("Type your queries or 'quit' to exit.")
while (true) {
print("\nQuery: ")
val message = readLine() ?: break
if (message.lowercase() == "quit") break
val response = processQuery(message)
println("\n$response")
}
}
Main entry point
Finally, we’ll add the main execution function:fun main(args: Array<String>) = runBlocking {
if (args.isEmpty()) throw IllegalArgumentException("Usage: java -jar <your_path>/build/libs/kotlin-mcp-client-0.1.0-all.jar <path_to_server_script>")
val serverPath = args.first()
val client = MCPClient()
client.use {
client.connectToServer(serverPath)
client.chatLoop()
}
}
Running the client
To run your client with any MCP server:./gradlew build
# Run the client
java -jar build/libs/<your-jar-name>.jar path/to/server.jar # jvm server
java -jar build/libs/<your-jar-name>.jar path/to/server.py # python server
java -jar build/libs/<your-jar-name>.jar path/to/build/index.js # node server
If you’re continuing the weather tutorial from the server quickstart, your command might look something like this:
java -jar build/libs/kotlin-mcp-client-0.1.0-all.jar .../samples/weather-stdio-server/build/libs/weather-stdio-server-0.1.0-all.jar- Connect to the specified server
- List available tools
- Start an interactive chat session where you can:
- Enter queries
- See tool executions
- Get responses from Claude
How it works
Here’s a high-level workflow schema:When you submit a query:- The client gets the list of available tools from the server
- Your query is sent to Claude along with tool descriptions
- Claude decides which tools (if any) to use
- The client executes any requested tool calls through the server
- Results are sent back to Claude
- Claude provides a natural language response
- The response is displayed to you
Best practices
-
Error Handling
- Leverage Kotlin’s type system to model errors explicitly
- Wrap external tool and API calls in
try-catchblocks when exceptions are possible - Provide clear and meaningful error messages
- Handle network timeouts and connection issues gracefully
-
Security
- Store API keys and secrets securely in
local.properties, environment variables, or secret managers - Validate all external responses to avoid unexpected or unsafe data usage
- Be cautious with permissions and trust boundaries when using tools
- Store API keys and secrets securely in
Troubleshooting
Server Path Issues
- Double-check the path to your server script is correct
- Use the absolute path if the relative path isn’t working
- For Windows users, make sure to use forward slashes (/) or escaped backslashes (\) in the path
- Make sure that the required runtime is installed (java for Java, npm for Node.js, or uv for Python)
- Verify the server file has the correct extension (.jar for Java, .js for Node.js or .py for Python)
# Relative path
java -jar build/libs/client.jar ./server/build/libs/server.jar

# Absolute path
java -jar build/libs/client.jar /Users/username/projects/mcp-server/build/libs/server.jar

# Windows path (either format works)
java -jar build/libs/client.jar C:/projects/mcp-server/build/libs/server.jar
java -jar build/libs/client.jar C:\\projects\\mcp-server\\build\\libs\\server.jar
Response Timing
- The first response might take up to 30 seconds to return
- This is normal and happens while:
- The server initializes
- Claude processes the query
- Tools are being executed
- Subsequent responses are typically faster
- Don’t interrupt the process during this initial waiting period
Common Error Messages
If you see:Connection refused: Ensure the server is running and the path is correctTool execution failed: Verify the tool’s required environment variables are setANTHROPIC_API_KEY is not set: Check your environment variables
You can find the complete code for this tutorial here.Then, add the required dependencies to your project:This creates the beginnings of a .NET console application that can read the API key from user secrets.Next, we’ll setup the MCP Client:Add this function at the end of the This creates an MCP client that will connect to a server that is provided as a command line argument. It then lists the available tools from the connected server.The client will: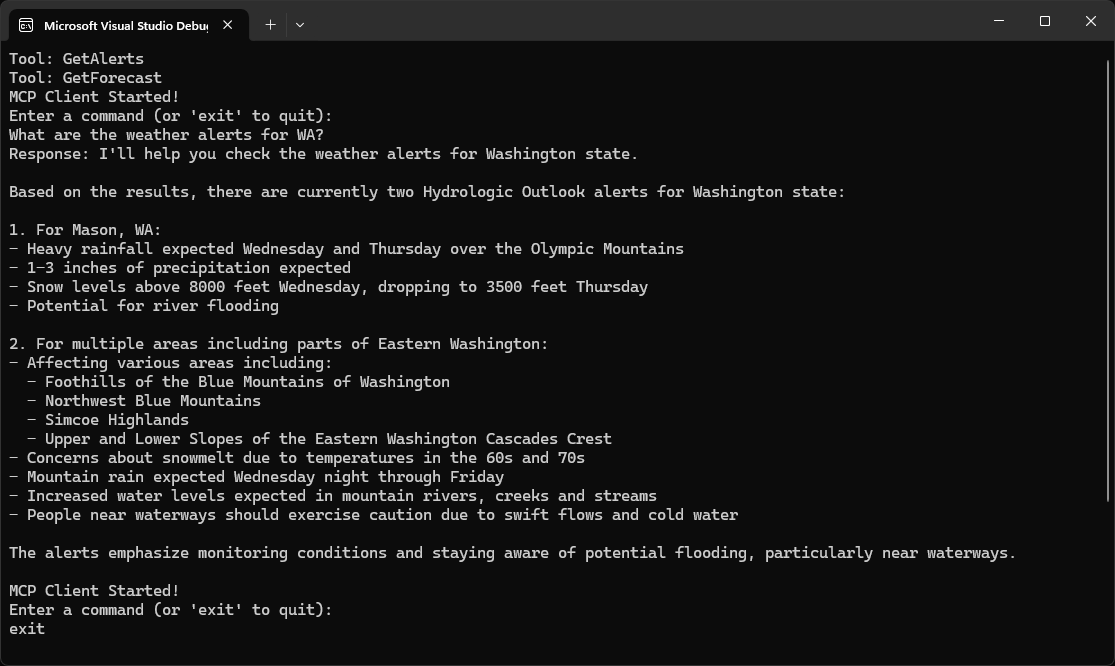
System Requirements
Before starting, ensure your system meets these requirements:- .NET 8.0 or higher
- Anthropic API key (Claude)
- Windows, Linux, or macOS
Setting up your environment
First, create a new .NET project:dotnet new console -n QuickstartClient
cd QuickstartClient
dotnet add package ModelContextProtocol --prerelease
dotnet add package Anthropic.SDK
dotnet add package Microsoft.Extensions.Hosting
dotnet add package Microsoft.Extensions.AI
Setting up your API key
You’ll need an Anthropic API key from the Anthropic Console.dotnet user-secrets init
dotnet user-secrets set "ANTHROPIC_API_KEY" "<your key here>"
Creating the Client
Basic Client Structure
First, let’s setup the basic client class in the fileProgram.cs:using Anthropic.SDK;
using Microsoft.Extensions.AI;
using Microsoft.Extensions.Configuration;
using Microsoft.Extensions.Hosting;
using ModelContextProtocol.Client;
using ModelContextProtocol.Protocol.Transport;
var builder = Host.CreateApplicationBuilder(args);
builder.Configuration
.AddEnvironmentVariables()
.AddUserSecrets<Program>();
var (command, arguments) = GetCommandAndArguments(args);

var clientTransport = new StdioClientTransport(new()
{
    Name = "Demo Server",
    Command = command,
    Arguments = arguments,
});

await using var mcpClient = await McpClientFactory.CreateAsync(clientTransport);

var tools = await mcpClient.ListToolsAsync();
foreach (var tool in tools)
{
    Console.WriteLine($"Connected to server with tools: {tool.Name}");
}
Program.cs file:static (string command, string[] arguments) GetCommandAndArguments(string[] args)
{
return args switch
{
[var script] when script.EndsWith(".py") => ("python", args),
[var script] when script.EndsWith(".js") => ("node", args),
[var script] when Directory.Exists(script) || (File.Exists(script) && script.EndsWith(".csproj")) => ("dotnet", ["run", "--project", script, "--no-build"]),
_ => throw new NotSupportedException("An unsupported server script was provided. Supported scripts are .py, .js, or .csproj")
};
}
Query processing logic
Now let’s add the core functionality for processing queries and handling tool calls:using var anthropicClient = new AnthropicClient(new APIAuthentication(builder.Configuration["ANTHROPIC_API_KEY"]))
.Messages
.AsBuilder()
.UseFunctionInvocation()
.Build();
var options = new ChatOptions
{
MaxOutputTokens = 1000,
ModelId = "claude-3-5-sonnet-20241022",
Tools = [.. tools]
};
Console.ForegroundColor = ConsoleColor.Green;
Console.WriteLine("MCP Client Started!");
Console.ResetColor();
PromptForInput();
while(Console.ReadLine() is string query && !"exit".Equals(query, StringComparison.OrdinalIgnoreCase))
{
if (string.IsNullOrWhiteSpace(query))
{
PromptForInput();
continue;
}
await foreach (var message in anthropicClient.GetStreamingResponseAsync(query, options))
{
Console.Write(message);
}
Console.WriteLine();
PromptForInput();
}
static void PromptForInput()
{
Console.WriteLine("Enter a command (or 'exit' to quit):");
Console.ForegroundColor = ConsoleColor.Cyan;
Console.Write("> ");
Console.ResetColor();
}
Key Components Explained
1. Client Initialization
- The client is initialized using
McpClientFactory.CreateAsync(), which sets up the transport type and command to run the server.
2. Server Connection
- Supports Python, Node.js, and .NET servers.
- The server is started using the command specified in the arguments.
- Configures to use stdio for communication with the server.
- Initializes the session and available tools.
3. Query Processing
- Leverages Microsoft.Extensions.AI for the chat client.
- Configures the
IChatClientto use automatic tool (function) invocation. - The client reads user input and sends it to the server.
- The server processes the query and returns a response.
- The response is displayed to the user.
Running the Client
To run your client with any MCP server:dotnet run -- path/to/server.csproj # dotnet server
dotnet run -- path/to/server.py # python server
dotnet run -- path/to/server.js # node server
If you’re continuing the weather tutorial from the server quickstart, your command might look something like this:
dotnet run -- path/to/QuickstartWeatherServer.- Connect to the specified server
- List available tools
- Start an interactive chat session where you can:
- Enter queries
- See tool executions
- Get responses from Claude
- Exit the session when done
Next steps
Example servers
Check out our gallery of official MCP servers and implementations
Example clients
View the list of clients that support MCP integrations